Translate topic in your language

Friday 22 February 2019

What is different type of Export and Import Available with ODI ?


Answer:- 


Exporting Objects :- 


When exporting an Object, an XML file is created.Objects have dependencies and these will be exported as Object IDs or Object Names in the exported XML file.


The content of this XML file will depend on the export method you will use:


1) Export With Child Components

2) Export Without Child Components


When an Object is exported with its child components, all container-dependent Objects IE those which possess a direct parent/child relationship – are also exported.However, referenced Objects are not exported.


The choice will depend on your goal, if you need to do a partial export then the Export Without Child Components is the one to use. The Export Multiple Objects feature is useful when you need to regularly export the same set of Objects.


Once the export has been performed, it is very important to choose the import strategy to suite your requirements


Importing Objects :- 


A general definition of import modes can be:


Importing an Object in Duplication Mode: The Object internal ID is reconstructed inside the new Work Repository. Container dependencies such as parent/child relationships are recalculated to match the new parent IDs. External reference IDs are not recalculated.


Importing an Object in Synonym Mode: The original Object internal ID is retained inside the new Work Repository. Container dependencies such as parent/child relationships are not recalculated. External references IDs are not recalculated.


The sub mode (INSERT, UPDATE, INSERT_UPDATE) will have the following behavior:


INSERT: Imported Object will be treated as a new Object. If an Object with the same ID exists in the Repository the import operation will not effect the numeric value (it will not be replaced).


UPDATE: Imported Objects will be treated as if the Object already exists. Its properties and child components will be updated accordingly. If an Object with the same ID does not exist in the new Repository, the import operation will have no effect.


INSERT_UPDATE: The imported Object will be either created, or updated to exactly match the content of the XML file. If the Object already exists, this method should be avoided when the export of the initial Object was performed without its child components. (This is to avoid any potential deletions of sub-components of the existing Object.)


Deciding Which Import Mode To Be Used When Importing ODI Objects


ODI import operations function in the following manner:


DUPLICATION mode


Creates a new object in the target Repository and inserts into it all of the elements which are present in the .xml import file currently being used for the import operation.


The ID of this new object will be based on the ID of the Repository in which it is to be created (the target Repository).


Synonym INSERT mode


Inserts a new object into the target Repository with the object ID as created in the original (Source) Repository (ie the one stored in the XML export file being used for the import operation).


In this case, the ID is based on the Repository ID from which the object was exported.


If any error is signaled, the transaction is aborted and an error message is displayed on standard output.


Synonym UPDATE mode


This mode updates the already existing attributes/components of an ODI object in the target Repository with the modifications of these components present in the XML file being used for the import operation.


An import of a Scenario in Synonym UPDATE mode does not mean that ODI will update the Scenario, but will only use UPDATE SQL statements to update the existing records composing the Scenario Object.


Hence, this is potential way to corrupt the Scenario. Please use Synonym INSERT_UPDATE mode instead.


For example, if one of your texts in the Scenario is <= 250 chars, this will be stored as a single record in the SNP_SCEN_TXT table, with internal ID myID1.


If, after the changes on source, the text becomes > 250 chars, there will be two records stored in the SNP_SCEN_TXT table, with internal IDs myID1 and my ID2.


If you import that Scenario in Synonym UPDATE mode, the text record with myID1 will be updated, but the one with myID2 will not be inserted…


If you import the Scenario in Synonym INSERT mode, the text record with myID2 will be inserted, but the one with myID1 will not be updated…


The only way to have myID1 updated and myID2 inserted, is to import the Scenario in Synonym INSERT_UPDATE mode. Or in Duplication mode, but then this will create a new Scenario object, with a new internal ID — and this is may not be what you are attempting to do.


Another example: If in an ODI Package, you have added a new step, this one will not be created with Synonym UPDATE import mode.


So, after the import UPDATE mode, the Package will be corrupted, as it will contain some of the changes, but not all of them….


Same for the INSERT mode: this one will create the new Package step, but will not update any of the existing steps. So again, the Package is corrupted after import


Conclusion: Use Synonym INSERT_UPDATE mode.


Synonym INSERT_UPDATE mode


If no ODI object exists in the target Repository with an identical ID, this import mode will create a NEW object with the ID of the object in the XML import file being used for the import operation.


The already existing attributes/components of the Object will be updated; the new ones, inserted.


REPLACE mode


Replaces the already existing ODI object in the target Repository with the one present in the XML file being used for the import operation.


If the object does NOT already exist – as identified by its ID – the import operation aborts.


What is an existing ODI object?


The notion of an existing object corresponds to a ODI object stored in the Repository (Procedure, Datastore, Scenario …) and possessing a unique object ID. For Knowledge Modules or specific procedures, for example, this corresponds to the I_TRT value (procedure number).


When importing a Knowledge Module in DUPLICATION mode, a new object is created with a new unique identifier (I_TRT) which has no relation whatsoever with the identifier of the object in the import file.


Performing a SYNONYM UPDATE on a KM from the same import file will have no effect on the targeted KM because they are no longer the same objects. This synonym import operation may even result in unexpected updates since there might already exist an object in the target Repository that has the same identical ID as the object stored in the XML file being used for the import operation.


Criteria for deciding when to perform an SYNONYM INSERT import mode


This import mode inserts an object with the SAME attributes as those attached to the object present in the XML file being used for the import operation. If any of the incoming attributes violate any referential constraints, the operation is aborted and an error message is signaled in the standard output.


– When using the synonym INSERT for importing Knowledge Modules, you may modify some procedure or other KM stored in your Repository. This will certainly occur when the Work Repository ID is identical to the one from which the export file has been created.


AVOID using SYNONYM import modes for Knowledge Modules – only use DUPLICATION import mode. To update existing Knowledge Modules, you may prefer to ‘replace’ the existing one (see on-line documentation regarding the import REPLACE mode).


– When using 2 similar Repositories, and a KM is modified in one of them, it is possible to export it and import it into the other Repository with the REPLACE mode.


Conclusion


DUPLICATION mode is used to transfer ODI objects between projects WITHIN the same Repository…


SYNONYM and REPLACE modes are used to exchange ODI objects between 2 different Repositories (such as Projects, Models, Scenarios…) and is particularly useful, for example, when exporting objects from development environments to production environments in order to be able to synchronize updates between Repositories…

Monday 18 February 2019

What is User Defined Flag in ODI ? UD1,UD2,UD3,UD4......


Answer:-


These are used for modification of KM and generally used in option to perform some modified action defined on the selected columns 


Example:- 


http://dwteam.in/scd-type3-in-odi/


http://odiexperts.com/order-by/


What is ODI Substitution Tags <%>, <'?'>, <@> and <$> ?


Answer :- 


Hi all, I bet that all ODI developers already got confused when working with ODI substitution tags. Every time that I need to work with those, I need to repeat all my previous tests again because I forget which tag is the right one to use (even after many years working with ODI….). That’s one of the reasons why I decided to write this post, so I can read my own post in future references (memory, memory, where are you???). Also because it is nice to share our experiences with others, so they can benefit from it (at least I hope so ) if they face similar issues.


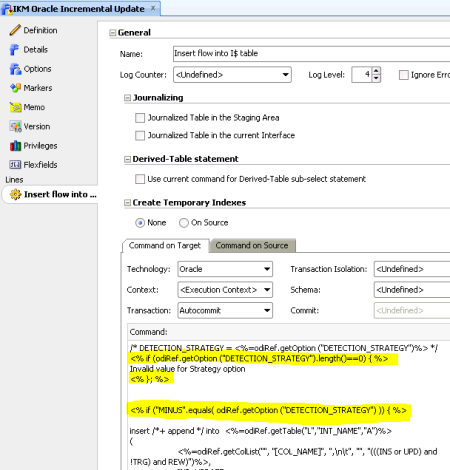
For all those that are not familiar with it, what are ODI substitution tags? Substitution tags are those characters that you find when you open a Knowledge Module or a procedure in ODI, like these ones: <%>, <'?'>, <@> and <$>. Here is one example:


Those tags are part of ODI Substitution API and they are used to produce dynamic code based on several things like ODI variables, procedure options, data models, interface diagram and so on. Basically the Substitution API is the greatest development power in ODI (that’s why I love ODI so much), since it can produce dynamic code based in the existing information around it. Oracle has a good documentation about it here: Oracle Doc


Although Oracle talks about substitution API in their documentation, it does not state about the tags themselves and in their examples they only talk about the most common tag that is the <%>. But in reality we have four types of it, each one behaving in its own way. Basically each one of them is executed in a specific order, which affects their results in a way greater than you could imagine.


I’ll explain each one of them using a real situation that happened to me some time ago. I was working in a project that contained several different servers (ODI agents) with different Operational Systems on them. I was developing a dynamic component code that had to change its behavior based on which OS that component was going to be executed, so if the OS server was Linux I would execute one particular command and if it was Windows another command. To test in which OS the component was in, I used the following Substitution API command with the following tag (the only one that I knew back then):


<%= System.getProperty(“os.name”) %>


It didn’t work as I expected. The result of this command was always returning the OS name of the machine in which I was launching the execution (the ODI client) not the one that the command was going to be executed (the ODI agent). It puzzled me, so I started to study which options I could use… that’s when I learned about , <@> and later on<$> tags. Each one of them has a different effect in ODI code generation because each one of them has its own parse phase! This is a very simple concept and it truly affects the ways that ODI generate its dynamic code.


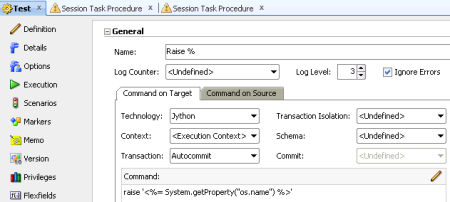
So let me show you what I did to test all those options. First consider that my ODI client is in a Windows 2003 OS and the ODI agent is a Windows Server 2008 R2 OS (the Linux OS was not available for me anymore, but this Windows 2008 will suffice for this example, since we just need different types of OSs). I created the following procedure:


It is a simple procedure with a Jython code that will “raise” the name of the OS as an error. I just marked “Ignore Errors” as well, so I could add more steps to this procedure. I did the same for all substitution tags:


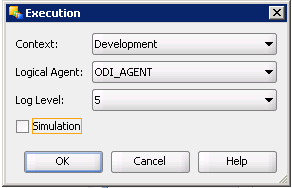
Then you execute the procedure, making sure that it uses the ODI agent (that resides in a different OS):


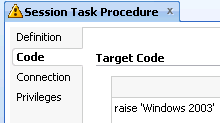
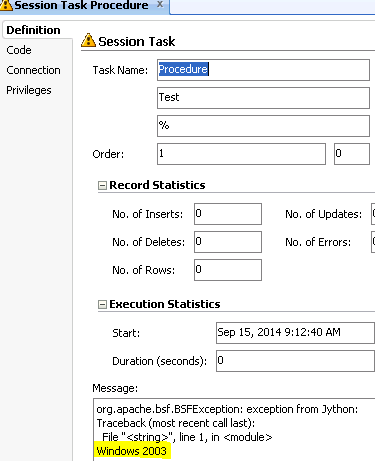
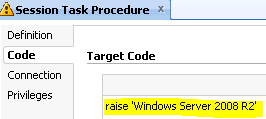
Let’s begin with <%>. After you execute the procedure and go to “Code” tab, we have the following:


Very interesting and it matches my previous experience. The <%> is returning the ODI client OS which indicates that the substitution API is generating the command when it is sent to the agent, but before it gets to the agent! Obviously if we go to “Definition” tab, we will get the execution of this command, which will be “Windows 2003”:


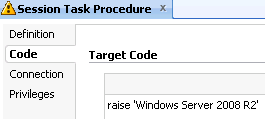
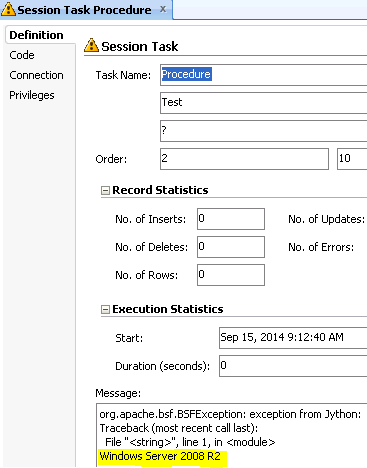
Let’s see what it did using <'?'> substitution tag:


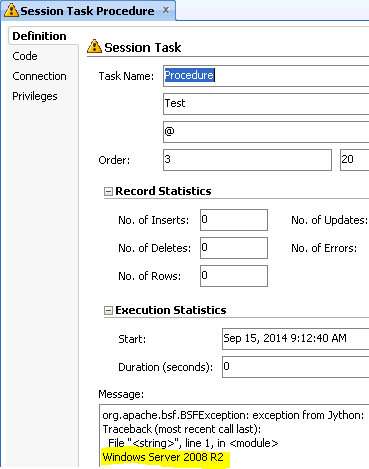
Nice! This is exactly what I previously wanted: get the ODI agent OS and decide which command was going to be executed based on that OS. So ODI is generating the code in the agent server, before the command is sent to Operator and before ODI variables are substituted (what, Operator, variables??? More on those topics in a few moments…). If we go to “Definition” tab, we will get the execution of this command, which will be “Windows Server 2008 R2”:


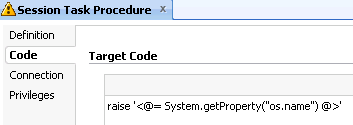
Ok, let’s see <@>:


Humm….. More interesting stuff and that’s why I mentioned Operator/ODI variables before. This code is being generated in the agent, but after the command appears in the Operator and after ODI variables are substituted. When we go to “Definition” tab, we will get the execution of this command, which will be “Windows Server 2008 R2” again:


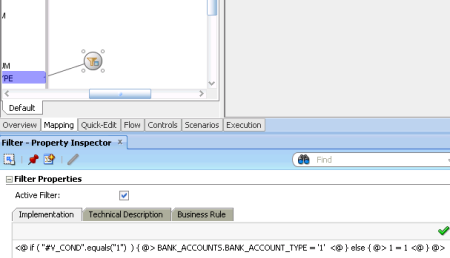
The <@> tag is great for you to evaluate ODI variables content and depending on that variable value, do something different in your code, like the example below:


The interface filter in this example will change accordingly to #V_COND variable. If #V_COND is 1, then it will filter all records with BANK_ACCOUNT_TYPE = ‘1’. If #V_COND is different from 1, then it will load all records.


Those three examples perfectly show us that each tag executes in a different parse phase and each one has precedence over the other. And now you must be thinking: does it means that we can mix and match those tags and create even more dynamic code??? Oh sure yes!


They show us how we can create “loops” using one tag and apply that result to another tag that will get executed right after that, which give us an extreme dynamic tool for developing. I already told you that I love ODI right?


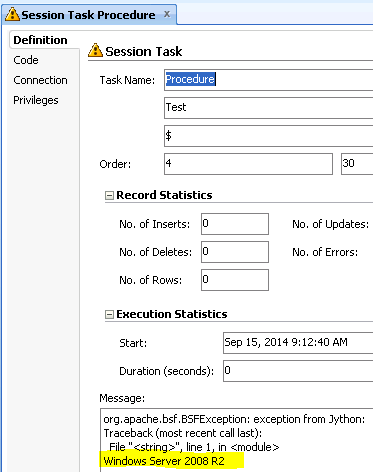
Ok, but what about <$>? I left this one for the end because this tag was added later to the game (it seems that it is available from 11.1.1.6 version on). This tag resides between <'?'> and <@> which give us the unique ability of generating the code in the agent server, before the command is sent to Operator but AFTER ODI variables are substituted. Ok, this is crazy stuff Why do we need it? The key here is that ODI will contain all ODI variables already evaluated (meaning containing its correspondent refresh/set values) and the code will be displayed in Operator already parsed with the correct ODI variables logic, which makes your code much more readable for the Operators users. Besides that, having a fourth parse phase is great to do even crazier dynamic self-constructed code (long live dynamic coding!!!). Here is “the same” example using <$> in an ODI interface from Oracle ODI blog (the place where I learned about the existence of <$>):


In our OS example, the <$> result will not be different from what we got using <'?'>:


And in Definition tab:


That’s it folks, so in resume here is the list of substitution tags and their parsing phase order:


<%>: generates the command when it is sent to the agent, but BEFORE it gets to the agent;


<'?'>: generates the code in the agent server, BEFORE the command is sent to Operator and BEFORE ODI variables are substituted


<$>: (available from 11.1.1.6 on): generates the code in the agent server, BEFORE the command is sent to Operator but AFTER ODI variables are substituted


<@>: generates the code in the agent server, AFTER the command appears in the Operator and AFTER ODI variables are substituted


What is Static Control and Flow Control ? Difference between both of them


Answer:- 


What is Data Integrity(Quality) Check in ODI:-


Data Integrity Check Process checks is activated in the following cases:


When a Static Control is started (from Studio, or using a package) on a model, sub-model or datastore. The data in the datastores(table) are checked against the constraints defined in the Oracle Data Integrator model.


If a mapping is executed and a Flow Control is activated in the IKM. The flow data staged in the integration table (I$) is checked against the constraints of the target datastore, as defined in the model. Only those of the constraints selected in the mapping are checked.


In both those cases, a CKM is in charge of checking the data quality of data according to a predefined set of constraints. The CKM can be used either to check existing data when used in a "static control" or to check flow data when used in a "flow control". It is also in charge of removing the erroneous records from the checked table if specified.


Static vs Flow control in Oracle Data Integrator


FLOW CONTROL :


Data quality validation is done before loading the data into target tables.


Check Control Knowledge Module (CKM) will create E$ table and SNP_CHECK_TAB table for data quality check.


It will validate data in I$ table before inserting data into target table. If it has any errors then it will delete from I$ table and insert into E$ table and common error message and interface name into SNP_CHECK_TAB.


STATIC CONTROL :


Data quality validation is done after loading the data into target tables.


CKM will validate data on target table and if any error is detected it will be inserted to E$ table and SNP_CHECK_TAB. Remember that the incorrect entry will not be deleted like Flow control. 


What is Recycle Errors in Data Quality in ODI?


Recycle errors is process for reprocessing the failed or rejected data from E$table to I$table.


E$table will contains all errored data from Flow Control or Static control for rejected due to Duplicate or null rows (PK, UK or CHK Constraints).


First we need to rectify error data in E$table and then we can enable RECYCLE ERROR=true option In IKM level. It will select data from E$table


and It will Insert Into I$table then again It will validate on E$table If It is valid data then it will load Into Target table otherwise it will insert into E$table.


What actually happening in the  flow control :- 


  • After loading the data into I$,a check table is created (SNP_CHECK_TAB) , deleting previous error table and previous errors as ODI generally does.

  • Now it creates a new Error table E$, and check for Primary key unique constraints , other constraints and conditions defined in Database or Model level ODI conditions and Not Null check for each column marked as Not null.

  • If records violate the above constraints and conditions, it adds the required records into E$ table and add an entry of it into SNP_CHECK_TAB with information about schema, error message , count etc.

  • Finally the other records are inserted and updated as per the KM and logic.


Error Table Structure


The E$ error table has the list of columns described in the following table:-


Columns    Description


----------------------------------------------------------------------------------


ERR_TYPE  Type of error: 


'F' when the datastore is checked during flow control


'S' when the datastore is checked using static control


ERR_MESS Error message related to the violated constraint


CHECK_DATE Date and time when the datastore was checked


ORIGIN Origin of the check operation. This column is set either to the datastore name or to a mapping                            name and ID depending on how the check was performed.


CONS_NAME Name of the violated constraint.


CONS_TYPE Type of the constraint: 'PK': Primary Key,'AK': Alternate Key,'FK': Foreign Key, 'CK': Check                            condition, 'NN': Mandatory attribute


----------------------------------------------------------------------------------


Summary Table Structure:-


The SNP_CHECK_TAB table has the list of columns described below:


Column Description


----------------------------------------------------------------------------------


ODI_CATALOG_NAME         Catalog name of the checked table, where applicable


ODI_SCHEMA_NAME Schema name of the checked table, where applicable


ODI_RESOURCE_NAME Resource name of the checked table


ODI_FULL_RES_NAME Fully qualified name of the checked table. For example ..


ODI_ERR_TYPE        Type of error:


'F' when the datastore is checked during flow control


'S' when the datastore is checked using static control


ODI_ERR_MESS         Error message


ODI_CHECK_DATE Date and time when the datastore was checked


ODI_ORIGIN Origin of the check operation. This column is set either to the datastore name                                              or to a mapping name and ID depending on how the check was performed.


ODI_CONS_NAME Name of the violated constraint.


ODI_CONS_TYPE Type of constraint: 'PK': Primary Key,'AK': Alternate Key,'FK': Foreign Key,'CK':                                            Check condition,'NN': Mandatory attribute (Not Null)


ODI_ERR_COUNT Total number of records rejected by this constraint during the check process


ODI_SESS_NO ODI         session number


ODI_PK Unique identifier for this table, where appicable


----------------------------------------------------------------------------------


Explain Lookup component in ODI 12c and what is the difference between Lookup and Join components ?


Answer:-


What is Lookup Component ?


A Lookup is a
selector component that returns data from a lookup flow being given a value
from a driving flow.The attributes of both flows are combined, similarly to a
join component.


Lookups can be
located in a dataset or directly in a mapping as a flow component.


When used in a
dataset, a Lookup is connected to two datastores or reusable mappings combining
the data of the datastores using the selected join type.


Lookups used as flow
components (that is, not in a dataset) can join two flows. A lookup condition
can be created by dragging an attribute from the driving flow and then the
lookup flow onto the lookup component.


Wednesday 6 February 2019

What is Sunopsis Memory Engine ?


Answer:- 


Actually Sunopsis Memory Engine is an In memory pure java based RDBMS. (hsqldb).


ODI provides Sunopsis Memory Engine as an in-memory database based on HSQLDB that serves quite well as a high-performing temporary data storage for intermediary data transformations. But, this engine is good for not too large set of data because it uses the memory from JVM that ODI runs on. For transformations of large data sets in interfaces, rather use an external RDBMS as the target or staging data-storage with truncate mode switched on . 


When you use the Sunopsis Memory Engine in an ODI interface or procedure an hsqldb in-memory database is created inside the JVM of the agent. The memory that is allocated to the hsqldb is taken from the JVM. As a result the maximum memory size that can be allocated to the in memory database is determined by the heap size parameter in the odiparams.bat file.


Monday 4 February 2019

What is Agent Load Balancing in ODI ? What is Commit and Isolation levels in ODI Procedures ?


Answer:- 


Standalone agent Load Balancing:- 


Load Balancing is a feature to provide optimal performance by distributing the execution of session over several agents. When an agent has linked agents defined, it automatically distributes the execution of its incoming sessions over the agents. Session distribution is made proportionally to the value specified in the Maximum Number of Sessions supported by an agent. This value reflects the agent’s availability and processing capabilities and is relative to the other agents. If Agent A has a value twice that of Agent B, A will receive twice the number of sessions B receives.


Note that the parent agent still takes charge of the creation of the session in the repository. Load balancing separates the creation and execution of a session. If you want the parent agent to take charge of some of the sessions and not just distribute the sessions, then it must be linked to itself.


When using load balancing, it is possible that an agent could reach the maximum number of sessions allowed. In this situation, the incoming sessions for this agent will be put in a Queued status. The Use pre-emptive load balancing Agent property allows for redistribution of queued sessions to agents as sessions finish. Otherwise, sessions are not redistributed.

Each ODI agent supports multiple sessions. Several sessions running within one agent run within the same agent process, each session using a different thread in this process. With load balancing, as sessions run in different agents, they run in different processes. On multi-processor machines, this can provide dramatic increase of performance, without having to define it at run-time. Load balancing is automatically handled provided that agents are correctly linked.


Commit and Isolation levels in Procedures:


Commit levels:-


Procedure is made up of group of tasks which are executed step by step .Each task is an SQL statement which needs to be committed. To manage the commit levels we have options like Auto commit and Transaction 0 to Transaction 9. Auto commit simply commits particular task in procedure. Transactions 0 to 9 are used to group the tasks need to commit at a time sequentially. This way we can manage the commit levels in ODI.


Isolation Levels:-


You will find this setting in ODI procedure you can set Transaction Isolation level for Source code as well as for Target code.


These levels are classified into four Committed, Uncommitted (Dirty), Repeatable, Serialazable.


Committed: The Tasks in the procedure will read the only committed data from the source.


Uncommitted (Dirty): The Tasks in the Procedure will read uncommitted data from the source (oracle doesn't support)


Repeatable: The Tasks in the Procedure while reading the huge amount of data it will lock the rows not to update at the point of time to avoid inconsistency.


Serialazable: The Tasks in the Procedure while reading the huge amount of data it will lock the respective table not to update at the point of time to avoid inconsistency.


How to perform Encrypting and Decrypting on ODI Procedures :- 


Encrypting a Knowledge Module (KM) or a procedure allows you to protect valuable code. An encrypted KM or procedure can neither be read nor modified if it is not decrypted. The commands generated in the log by an Encrypted KM or procedure are also unreadable.


Oracle Data Integrator uses a DES Encryption algorithm based on a personal encryption key. This key can be saved in a file and reused to perform encryption or decryption operations.


WARNING:


There is no way to decrypt an encrypted KM or procedure without the encryption key. It is therefore strongly advised to keep this key in a safe location. It is also advised to use a unique key for all the developments.


To encrypt a KM or a Procedure:


Right-click the KM or procedure you wish to encrypt.


Select Encrypt.


In the Encryption Option dialog, either:


Select the Encrypt with a personal key option and select an existing Encryption Key file


Select the Encrypt with a personal key option and then type in (or paste) the string corresponding to your personal key


or let Oracle Data Integrator generate a key using the Get a new encryption key option.


The Encryption Key dialog appears when the encryption is finished. From this dialog, you can save the key.


Note that if you type in a personal key with too few characters, an invalid key size error appears. In this case, please type in a longer personal key. A personal key of 10 or more characters is required.


To decrypt a KM or a procedure:


Right-click the KM or procedure that you wish to decrypt.


Select Decrypt.


In the KM/Procedure Decryption dialog, either:


Select an existing encryption key file


or type in (or paste) the string corresponding to your personal key.


A message appears when the decryption has finished.

Friday 1 February 2019

What is Array fetch and Batch update size parameters in ODI ?


Answer:-


There are two parameters in Oracle Data Integrator topology that can be tweaked to improve performance of loading. These two parameters are, 


  • Array Fetch size 

  • Batch Update size


The Array Fetch size parameter can be tweaked for the source data server. This defines the number of records read from the source at a time and this data is stored in the agent. 


The Batch Update size parameter may be tweaked for the target data server. This defines the number of records fetched in one batch to be written to be server stored in the agent. 


When you increase number of records per batch, the time taken to read and write the total records will be less. This would mean you have lesser batches in total, hence improving performance. Since more data is stored in RAM, a good RAM size would be a necessity. 


Oracle recommends the following, 


For good networks with little latency values less than 30 can be kept. However with a poor network the parameters have to be set as greater than 100. 

The typical values as per oracle is between 50 and 500. 


Explanation :-


When data flows through the agent, it is usually read on a source connection (typically via JDBC) by batches of records, and written to the target by batches. The following parameters can help you tune this data flow:


  • Array Fetch in the source data server definition. This parameter defines the size of the batches of records read from the source at a time and stored within the agent.


  • Batch Update in the target data server definition. This parameter defines the size of the batches of records written to the target.


Big Array Fetch/Batch Update values have the following consequences:


The same number of rows will be read in fewer batches, thus reducing the network overhead caused by the client/server communication. This is useful when the client/server protocols are very verbose. Another consequence of this approach is that the agent stores a bigger amount of data, and requires more RAM.


The Batch Update/Array Fetch configuration is a compromise between network and agent overhead.With a highly available network, you can keep low values (less than 30, for example). With a poor network,you can use larger values (100 and more), or you can consider using another method, for example using un-loaders/loaders and low bandwidth protocol such as FTP. Array Fetch/Batch Update typical values are between 30 and 500


Standard definition :-


Array Fetch Size (Row prefetching):- 

What ODI calls Array Fetch Size is commonly known as row prefetching:


"The concept of row prefetching is straightforward. Every time an application asks the driver to retrieve a row from the database, several rows are prefetched with it and stored in client-side memory. In this way, several subsequent requests do not have to execute database calls to fetch data. They can be served from the client-side memory".


For ODI this means that the higher you set this value the more rows will be retrieved per request to the source and then stored in the memory of the agent.


The main advantage is that you don’t have to re-read the same block multiple times from the source and as a result reduce the number of consistent gets. A database block typically holds more than one row, if you have set your Array Fetch Size to a low number, e.g. 1 and you have 5 rows on a block the database needs to read this block five times to retrieve all rows. Another advantage is that you need fewer round-trips to the server.


Batch Update size  (Array Interface):- 

What ODI calls Batch Update size is commonly known as the Array Interface:


“The array interface allows you to bind arrays instead of scalar values. This is very useful when a specific DML statement needs to insert or modify numerous rows. Instead of executing the DML statement separately for each row, you can bind all necessary values as arrays and execute it only once, or if the number of rows is high, you can split the execution into smaller batches.”


The advantage is that you need fewer round trips to the database and decrease network traffic.


This is applicable for any of the Knowledge Modules that use binding between source and target, e.g. LKM SQL to Oracle.

What Is an Agent? Different type of Agents in ODI and what is the major difference between them.


What Is an Agent?


An agent is a Java process that's usually located on the server and listens to a port for incoming requests. It runs the requested scenario, reverse-engineers requested datastores, etc.


When a job submitted through ODI Studio GUI or through the startscen.sh agent gets scenario from the work repository and topology definitions from master repository, it combines and converts them into a runnable job, usually consisting of more than one code block. Then, it sends code blocks to destination environments, which may be DB servers, file servers, Hadoop name nodes, etc. Finally, the agent gets job statuses from these environments and writes into work repository tables for us to see from the Operator tab of ODI Studio.


Agent Types:-


1) Standalone Agent

Historically, this is the original ODI agent, and it is still available today. The number one benefit of this agent is its very light footprint: it does not require an application server since it is a standalone Java program. This makes it ideal for installations on busy and already active systems, including database servers. It provides all the required features to orchestrate data integration processes, including exposing these processes as web services. The lightweight nature of the agent brings many benefits:


In an ELT architecture, the agent can reside on the same server as the target database, hence reducing the number of network hops when transferring data through JDBC (see Understanding Where to Install the ODI Standalone Agent for more details on this);

For integrations that require access to flat files, scripts and utilities that are not accessible from the network, installing the agent on the file server or the machine that hosts scripts and utilities makes for a very flexible infrastructure.

Lifecycle and availability of a Standalone Agent is managed by Node Manager monitoring and restarting the agent.


2) JEE agent :-

The ODI Agent can be deployed in a standalone environment as well as on the industry leading WebLogic Server. It is with the WebLogic server deployment that ODI achieves scalability and high availability. For deploying on WebLogic server ODI ships with a JEE application and a domain configuration deployment template to assist in configuration of the agent/

Some pros of JEE agent are:


High availability: Through Web Logic Server’s cluster architecture, even if a node is down, agents may run on other nodes.


Configurable connection pooling: Connection pool can be configured through WLS.


Monitoring: Oracle Enterprise Manager can monitor, configure, alert, and manage ODI JEE agents. But there is a plug-in to be installed to achieve this tasks from OEM.


3) Colocated Agent

This is the newest agent type that arrived with ODI 12c. It's like a combo of other two types. The agent is a standalone agent, but it can be monitored and configured through WLS. Unfortunately, it does not take advantage of connection pooling or high availability. Our agent will be in the WLS domain and can be managed through WLS — and that’s all. It is lighter than the JEE agent. Companies that prefer JEE Agent as production agents should choose the colocated agent as their dev/test agent.


Where to Locate an Agent:-

To decrease network I/O, it is better to locate the agent for the target DB server. Since the agent submits code to DB Engine, it is better for them to be on the same machine. Don’t forget that ODI is an ELT tool, which means it will load data into target server and then transform your data. So, most of the load will be on the target server, which also means that most of the code will be submitted to the target server.


Also, since an agent is a local Java process, the agent will write files to the machine upon which it is set up. If you have a file server other than the DB server, it's better to have another agent on the file server to handle read/write file processes. Mounting the file server directory to the DB server as a directory and setting up only one agent is another solution.


Also, these solutions will prevent any firewall-related problems